Inform Trial Access Guide
Start testing with Inform in less time than an episode of Star Trek: Strange New Worlds. Musical montage, not required.
Getting Started with the Inform API
Introduction
Welcome to the Inform API! This guide is designed to help you quickly get up to speed with our API so you can start evaluating its capabilities. This guide is structured to walk you through the essential steps for provisioning users, connecting data sources, retrieving data, and testing with our platform. This is a lightweight guide focused on testing in Postman or a similar application. In case some developers want to delve deeper, we will provide links to more comprehensive documentation.
Prerequisites
Before you begin, ensure that you have:
- A Validic account with API access.
- API keys and tokens are provided by Validic Technical Support.
- Basic knowledge of RESTful APIs and JSON format.
If you just signed up for your 30-day trial, you will generally receive this information via secure email within 24 hours.
Step 1: Creating Users
Provisioning a User
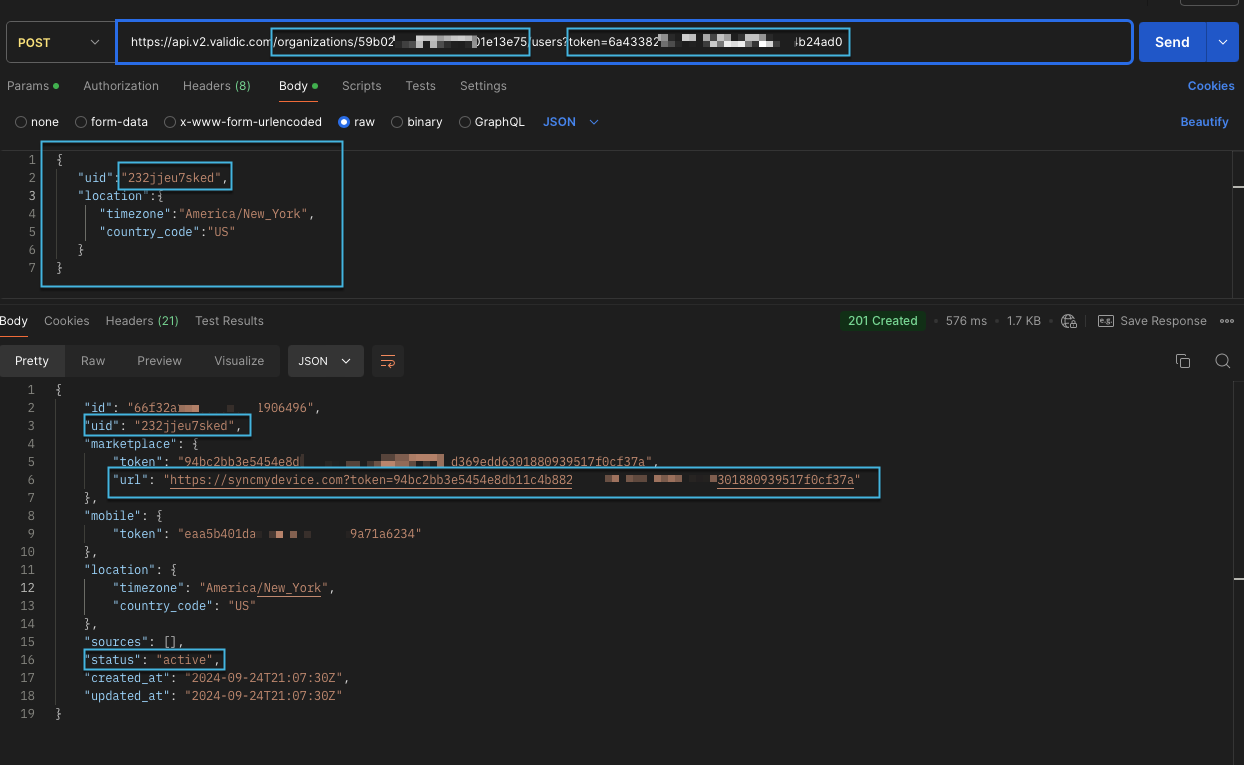
To access an end user's data, you need to create a representation of that user in our system. This is done through a process called provisioning. Here’s how you can provision a user:
API Request:
curl --location 'https://api.v2.validic.com/organizations/:org_id/users?token=:token' \
--header 'Content-Type: application/json' \
--data '{
   "uid":"your_user_id",
   "location":{
      "timezone":"America/New_York",
      "country_code":"US"
   }
}'
Parameters:
org_id: Your organization ID provided by Validic.token: Your API token for authentication.uid: A unique user identifier, free from any identifying data.
Response:
- A successful request will return a
201 Createdstatus and a JSON object with user details.
Best Practices for User Provisioning
- Use unique identifiers that comply with HIPAA regulations.
- Avoid including personally identifiable information (PII) such as names or social security numbers.
- Only provision users when they are ready to connect a device to avoid unnecessary database bloat.
Step 2: Connecting Data Sources
Requesting Access to Data
The user must grant permission via the Validic Marketplace to access user-generated data. Use the marketplace URL provided in the user provisioning response to connect the desired data source.
Example Request:
https://syncmydevice.com?token=your_marketplace_tokenCustom Marketplace:
If you need a custom marketplace experience, append &format=json to the URL to get a JSON representation of available data sources.
Sample Data Source Connection
Here’s an example of connecting a user to Fitbit:
- Provision a User: Use the steps outlined in Step 1.
- Access the Marketplace: Navigate to the marketplace URL returned in the response.
- Connect the Source: Select Fitbit and follow the prompts to authorize the connection.
Step 3: Retrieving and Using Data
Available Data Endpoints
The Inform API provides access to several types of data, including:
- cgmReturns a list of time series CGM (blood glucose) data for a given user.
- intradayReturns a list of time series activity data for a given user.
- measurements: Height, weight, blood pressure, etc.
- nutrition: Daily nutritional intake.
- sleep: Sleep records.
- summariesReturns a list of summaries for a given user.
- workouts: Detailed records of workout events.
See this document for the expected metrics per endpoint for different Validic supported sources.
Making API Requests
To retrieve data, use the following endpoint format:
API Request:
GET https://api.v2.validic.com/organizations/:org_id/users/:uid/:object_type?start_date=YYYY-MM-DD&end_date=YYYY-MM-DD&token=:tokenExample:
GET https://api.v2.validic.com/organizations/your_org_id/users/user123/measurements?start_date=2023-01-01&end_date=2023-01-07&token=your_api_tokenFiltering Results:
You can filter data by date range and source using query parameters.
Understanding Responses
The response will include an array of data objects. Here’s a sample response for weight measurements:
{
    "data": [
        {
            "checksum": "5993dd11a1a5a501866443f9d52d52a3",
            "created_at": "2024-10-02T20:22:44.669Z",
            "deleted_at": null,
            "end_time": "2024-10-02T04:00:00Z",
            "id": "8ea06771a385107a416c7359f237d069",
            "log_id": "1727827200000",
            "metrics": [
                {
                    "origin": "manual",
                    "type": "body_weight",
                    "unit": "kg",
                    "value": 91.1
                },
                {
                    "origin": "manual",
                    "type": "bmi",
                    "unit": "kg/m2",
                    "value": 31.51
                }
            ],
            "offset_origin": "profile",
            "source": {
                "device": null,
                "type": "fitbit"
            },
            "start_time": "2024-10-02T04:00:00Z",
            "tags": [],
            "type": "measurement",
            "user": {
                "organization_id": "59b02bbdf758800001e13e75",
                "uid": "232jjeu7sked",
                "user_id": "66f32a12185d520011906496"
            },
            "user_notes": [],
            "utc_offset": -14400,
            "version": "1.0"
        }
    ]
}
To fully understand our data model, we suggest you review these pages in their entirety:
Step 4: Testing with Inform
Setting Up Test Users and Devices
It’s important to use new users and data source accounts for testing. Here’s how to test using Fitbit:
- Create a Fitbit Account: Download the Fitbit app and set up a free account.
- Authorize the Connection: Use the marketplace URL to connect the test user to Fitbit.
- Log a Workout: In the Fitbit app, manually log a workout such as biking.
Validating Data Transmission
Use the GET /workouts API call to retrieve the logged workout data.
Example API Call:
GET https://api.v2.validic.com/organizations/your_org_id/users/test_user/workouts?token=your_api_tokenExpected Response:
{
  "data": [
    {
      "id": "workout_id",
      "type": "workout",
      "category": "biking",
      "metrics": [
        {
          "type": "distance",
          "value": 5000,
          "unit": "m"
        }
      ],
      "start_time": "2023-01-01T12:00:00Z",
      "end_time": "2023-01-01T12:30:00Z"
    }
  ]
}
Congrats! You've completed the basic Inform testing! You could stop here, BUT you'll miss the good stuff.
Going Deeper: Exploring the Streaming API
While the RESTful API is ideal for retrieving specific user data on demand and performing administrative functions, the Streaming API offers near-real-time data updates at the organization level, which can be crucial for applications that require instant access to new events as they occur.
Why Use the Streaming API?
The Streaming API is best suited for scenarios where you need:
- Near real-time access to user data: Receive updates as soon as data is available without needing to poll the server.
- High-frequency data: Ideal for applications that require instant processing, such as monitoring or alert systems.
- Efficient data handling: Avoid the overhead of repeated polling by establishing a single connection to receive continuous updates.
How the Streaming API Works
The Streaming API uses Server-Sent Events (SSE) to push data to connected clients. It establishes a long-lived HTTP connection, where clients receive events such as "poke" (a heartbeat signal) and "data" events containing the actual user data.
Setting Up a Stream
-
Create a Stream:
First, you need to create a stream resource. This resource will define what types of data you want to receive (e.g., measurements, summaries).
Example Request:
   curl -X POST /streams?token=:token
   -H Content-Type: application/json

   -d
   {
     "name": "my_first_stream",
     "start_date": "2023-01-01",
     "resource_filter": ["summary", "measurement"]
   }
This request creates a stream named
my_first_streamthat filters only summary and measurement data. -
Get the Stream ID:
After creating the stream, retrieve the stream ID using:
GET https://streams.v2.validic.com/streams?token=:tokenThis call will list all streams for your organization, sorted by creation date.
-
Connect to the Stream:
Once you have the stream ID, connect to it using the following request:
GET https://streams.v2.validic.com/streams/:id/connect?token=:tokenThis creates a long-lived connection where the server pushes events to the client as they occur.
-
Test the Stream Connection:
After establishing a connection, you should start receiving data events. Use the sample request below to ensure your connection is active:
GET https://streams.v2.validic.com/streams/:id/connect?token=:tokenYou should see "poke" events indicating the connection is alive, followed by "data" events containing the actual user data.
Replay a Stream
You can replay a stream to reprocess past events or handle missed data. This is particularly useful for debugging or when you need to re-ingest data.
Example Replay Request:
GET https://streams.v2.validic.com/replay?resources=summary,measurement&token=:token&date=2023-01-01This request replays all events from the specified date onward.
Handling Connection Events
Every connection or disconnection from a data source will generate a unique connection event. These events help you track user activity and data source connections in near real-time.
Additional Resources
For more detailed information on how to work with streams, please refer to the following guides:
If you have any issues or questions, feel free to reach out to your Validic representative or consult the Inform Streaming API Documentation.
Additional Resources and Support
For more detailed documentation, visit our Help Center. If you encounter any issues during your trial period, please contact your Validic representative or our support team at [email protected].
Updated 4 months ago